HIGH RANCHU MON

HIGH RANCHU MON
Art by Alexander Vasiljev, Copyright © 2020

HIGH RANCHU STORE - AZAYAKA RANCHU FOOD

Showing posts with label equipment. Show all posts

Tuesday, September 19, 2017

A WAY TO RAISE RANCHU ● CONTAINERS FOR RAISING RANCHU


Concrete Pond

Concrete has been a long time favorite material for building traditional ranchu ponds. Common sizes are 6.6 ft x 6.6 ft x 10in (2m x 2m x 25cm) and 5ft x 5ft x 10in (1.5m x 1.5m x 25cm). Square size is easy to arrange in succession, maintain and clean.

In the past, there was an indentation made on the bottom of the pond in the shape of a square, for collecting and removing of debris and for the fish to be kept during the water change. Also, there was a white tile placed on the bottom of the pond to determine translucency and color of the green water. However, nowadays, these features are not used.


Fiberglass or Polyethylene Pond

These materials are strong and durable and are commonly used in modern days and have good qualities for thermal insulation. Although, if the walls are too thin the pond might get deformed under the water weight.


Plastic Pond 

Any large plastic container, e.g. cement mixing tub or children’s pool, etc, can be used, as long as it's depth is between 9-12in (22 - 30cm). These containers are durable, cheap and come in different sizes, shapes and colors. Quite suitable for raising fry and young ranchu.


Pond Liner

It is a good option for DIY and can be used to create pond of any size and shape. Although, it is more prone to leaks.

_________________________________________________________________________________

Links to published chapters:

● INTRODUCTION
● WATER
● NOTES ON GREEN WATER & WATER CHANGE
● WATER TEMPERATURE
● AERATION
● SUNLIGHT AND SHADE
● CONTAINERS FOR RAISING RANCHU
● FOOD
● FEEDING REGIMENT
● BREEDING & SPAWNING
● RAISING & GROOMING FRY
● GROOMING KUROKO AND TOSAI
● CULLING
● SELECTION METHODS
● CULLING ROUND - I
● CULLING ROUND - II
● CULLING ROUND - III
● CULLING ROUND - IV
● CULLING ROUND - V
● FORSEEING RANCHU CHANGES IN THE FUTURE

_________________________________________________________________________________


Monday, October 31, 2016

TRANQUIL SOUND OF WATER

I have two old bamboo clumps on the property, each with 50-60 ft (15-18 m) tall stalks. An endless bamboo supply for all the things I would like to make. One of them - kakei or bamboo spout. A great feature that I recently added to my ranchu pond.

A small pump supplies water to the kakei. Not just visual, it makes a beautiful sound and in addition, aids in water circulation. It makes the ranchu pond complete.

Amidst the daily chores, I need to find more time to succumb to the tranquility of the setting and contemplate the motion of ranchu!


Thursday, September 8, 2016

A NEW CHAPTER BEGINS

It has been a long time since I've posted here. So, I thank you for your patience and understanding! I missed talking and sharing about my ranchu too.

But there were priorities. My new home required many hours of fixing and building and improving, before I could start thinking of my ranchu proper accommodations. It took a little over six months to finally come around to build a permanent display pond for my fish!

Here is what I have accomplished so far. After the screened aluminum cage with a solid roof was erected, and the deck with decorative walls were built, the final steps of ranchu display pond were as follows:

The deck was constructed with a step to accommodate the existing 8ft x 2ft x 1ft (2.4m x 61cm x 30cm) fiberglass pond. Deck step allowed me to have the pond recessed for a more pleasant display.   


Now, the drain. Previously, I have used a pump to move the water in and out of the pond. This time, I wanted to install a drain and let gravity do the job. My objectives were to have the drain that could be SECURELY plugged and to use the simplest plumbing possible. After much deliberation, I ended up with purchasing five components: 
  • heavy duty garden hose 
  • nozzle
  • ¾ garden hose to ¾ NPT brass coupler
  • bulkhead fitting 
  • rubber plug


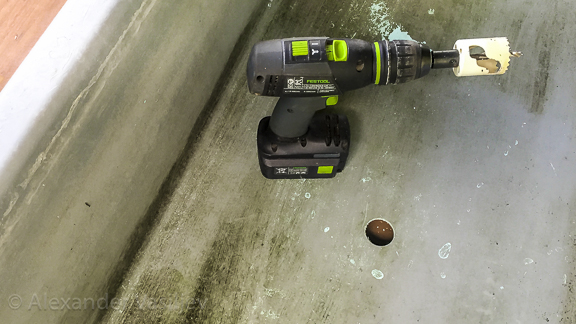
After the hole in the fiberglass pond was drilled, I fitted it with the bulkhead assembled with a brass coupler.


The garden hose was attached to the coupler underneath the pond and threaded through the hole left in the screened cage concrete header. 


Finally, the moment I had been waiting for - to fill the pond with water and let the ranchu into their new home!


Here are a few comments and technical details. Due to under one inch (2.5 cm) garden hose diameter and less than two feet high gradient between the bottom of the pond and the draining ground, the time to empty the pond with its over 115 gal (435 l) of water is lengthy, about 45 to 50 min. But not a big trade off considering that the drain assembly is super simple, super reliable and very easy to fix. For my display pond I perform 100% water change every two weeks, as I still use bio filtration and a UV lamp. 

On the other hand, to fill back the pond is a breeze. The water comes from the well and as soon as the pond is full the ranchu are in. No additional chemicals are used and the temperature of freshly pumped water is within 1-2 degrees of the water temperature in the tub. In addition, my well water is first pumped in to an aerator and gets infused with some oxygen, further I turn up the air pump during the filling. So far, I haven't noticed any visual distress when the ranchu enter fresh water. The deck and the pond are under the solid roof that deflects heat and protects from direct rain, and since the screened cage is opened on all three sides, there is a plenty of breeze to cool the summer heat. Water temperature stays below 83F (28C) even when the air temperature soars well above 90F (32C).  

I have more improvements on the way and of course I have to start and finish the fishery, BY FEBRUARY! It is going to be a separate structure with a series of ponds and a culling station. But for now, I can take a short brake and enjoy my ranchu peacefully swimming in their new home! The new chapter has began!


Wednesday, July 29, 2015

NOT A STRANGER TO A STRAINER

I just realized that my most used tool in ranchu keeping is a fine metal mesh strainer, the one commonly used in the kitchen. The strainer that I have is 4 in (10 cm) in diameter and is made of staines steal.


One main use is to rinse and drain bloodworms. I usually thaw bloodworms in the cup of pond water and rinse under the running faucet in the strainer. Very convenient! I also use the strainer to skim the pond surface from anything floating. Especially after feeding bloodworms, as their undigested casings will float to the surface.

It is very easy to clean and sterilize!

Friday, May 8, 2015

A PROPER ATIRE

Finally, I was able to purchase proper enamel bawls for my ranchu, exactly the same bowls that are used for ranchu competitions throughout Japan. Even in Thailand, you have to know where to go to find them. If it was't for Aor's, Thai ranchu master, generously taking us to the right place, I would have not fond them on my own.

It was at the local market on the north side of Bangkok that has a vendor selling them. However, knowing that wasn't enough to locate the bowls without Aor's assistance. There was no way that I would have found these bowls at the small stall stuffed up to the roof with many goods and home utensils.  As we pulled the bowls from the stacks, there were several sizes available. Notice my new enamel bowls in the previous post. Thank you Aor!!


Buying enamel bowls for my ranchu at the Bangkok's local market

Wednesday, November 26, 2014

FEEDINGS, FEEDERS AND SCHEDULES

Feeding schedule and portion size are important parts of ranchu grooming. Both depend on the season of the year and the age of ranchu along with the goals of the keeper.

Ranchu are coldblooded animals and their metabolism is directly correlated with the water temperature. It is important to observe seasonal temperature fluctuations and adjust ranchu feeding accordingly. Below is a table showing different temperatures and their effect on ranchu:

32-43 F (0-6°C) - hibernation state
44-54 F (7-12°C) - semi-hibernation state
55-64 F (13-18°C) - intermediate state between hibernation and active states
65-75 F (19-24°C) - ranchu are ready to spawn
76-86 F (25-30°C) - ranchu grow actively 
87-97 F (31-36°C) - ranchu growth slows down
98-100 F (37-38°C) - upper temperature limit for ranchu

It is beneficial for ranchu to hibernate. However, in my case, bound by the indoor set up, the water temperature doesn't drop below 55-64 F (13-18°C) keeping my ranchu in the intermediate state, between hibernation and active states. Their digestive tract works noticeably much slower as their activities calm down. At this time, I feed them only once or twice a day, depending on the temperature. In the spring the temperature rises and when "the stars align" the ranchu will spawn. I increase the amount of feed from two to three times per day. In the summer months keeping ranchu indoors has its advantage. With my temperature controlled environment, I don't have to worry about high temperatures above 86 F (30°C). The feeding is three to four times a day.

I feed as much as my ranchu can collectively eat in five minutes. Although, regardless of the method by which the amount of food is determined, observing ranchu and adjusting the food amount according to their appearance is a must. Overfeeding is not good for ranchu, as for anybody else, it shortens their life span and may prevent them from breeding.

I use the above schedule for my nisai and will continue using it when they turn oya age. On the other hand, it is very different with the fry, BBR, CBR and tosai. In upcoming months, I will share my feeding schedule for the young fish, but for now I will say that correct feeding regime is crucial in the first year of ranchu development.

For its very convenient and consistent way, I have been using automatic feeders to feed my ranchu with high quality dry pellets. It is especially helpful when I have to feed three or four times a day and my timetable doesn't allow me to be around. Ranchu appreciate the schedule and quickly learn at what time the food is given and gather around the feeding area. Afterwards, they can "plan" their time, whether to forage for algae, promenade back and forth in the tank or nap. I find that automatic feeders are actually helpful in preventing overfeeding. The many temptations I have had to give an extra pinch or two of pellets to my ever hungry ranchu are now prevented by the feeder.

Among the several automatic feeders available, I have chosen Eheim Everyday Fish Feeder. It is reasonably priced for what it can do, programable for up to four meals a day, has sizable food reservoir and long battery life. One unfavorable feature of this feeder is that it doesn't dispense exact amounts of pellets each time. As the pellet reservoir empties, the portions may become irregular. This is, however, not a big concern of mine. I learned to keep the reservoir full and don't let it get completely empty. It works best with pellets larger than 1.5 mm in size.

For smaller pellet size and granules to feed the fry, I found that Fish Mate F14 Aquarium Fish Feeder is the best. It has 14 compartments and can dispense food for up to four times a day. I use this feeder to supplementally feed the fry with granules size of 360-650 microns. I especially like that it slowly dispenses food for over a period of time, giving every fish a chance to eat. An air tube can be attached to the feeder to keep the food from clumping. One thing about this feeder is that you have to refill it quite often, but its overall convenience beats that.

Eheim Everyday Fish Feeder
Fish Mate F14 Aquarium Fish Feeder


Monday, June 16, 2014

CULLING NET - STEP BY STEP DIY

I made some traditional culling nets. They are quite a necessity during the ranchu culls. The nylon mesh is gentle on the fish and the net allows you to pick the fish up and observe it from the side.

Materials:
  1. bamboo stick of ½ to ⅝ inches diameter cut to 11-12 inches length 
  2. galvanized utility wire, 14 gauge 
  3. nylon mesh with fine weave
  4. twine
  5. nylon thread for sewing
Equipment:
  1. mold - any cylinder object of desired diameter (ex. coffee mug)
  2. drill with a drill bit 
  3. pliers
  4. scissors
  5. sewing needle


Bend the wire around a cylinder object of desired diameter to make a wire loop. Use pliers to bend the wire ends as shown


Drill two holes of the same diameter as wire in the bamboo handle


Place wire loop over the bamboo handle and insert bent wire ends into the drilled holes


Use twine to wrap over the wire firmly affixing it to the bamboo handle


Cut a circle from a nylon mesh that is ⅜ inches larger than the wire loop and sew it to the wire with a sewing needle, wrapping the mesh over the wire. Make sure that the mesh is not stretched too tight.


Finished culling net

Culling net detail


Wednesday, February 26, 2014

CONSISTENCY

The most important secret in goldfish keeping is CONSISTENCY. Ranchu, as most goldfish, are strong and adaptable to a variety of water chemistry and temperatures. However, it is often a mistake to chose one set of "ideal" parameters, as recommended in common literature and try to change exciting water chemistry to those standards. For example, shifting pH and what is even more difficult keeping it at a certain level. Obviously, complete understanding of water chemistry is necessary - pH, hardness, buffering capacity, nitrate cycle, etc. But more important here is to recognize the acceptable range of parameters present in the current water and keep them stable within the range. This will provide needed consistency.

In my case, the tap water is well buffered but more alkaline, with pH ranging between 8.1 and 8.2. The ranchu adapted to this pH and will be doing fine, as long as I will maintain consistency. At this higher pH level, however, ammonia becomes more toxic and even small traces of it can be stressful on fish. So, my attention was given to building a sufficient bio-filter, that has been doing a great job so far in keeping the ammonia and nitrite levels at their lowest. Weekly 90% water changes further reduce nitrates and thus my water parameters are kept stable.

I acquired a couple of new gadgets to help me to monitor the water. One is a digital pH meter, that instantly reads pH and gives me an idea about the overall stability. Another gadget is a digital infrared thermometer that I use during the water changes and to help me to decide on the amount and frequency of food while temperatures fluctuate. It is instant accurate and very convenient. One thing to remember with infrared thermometers however, is that they ONLY read temperature of the surface. I usually take readings of the surface that is agitated by the air bubbles.


EcoTestr pH2 by Oakton
Fluke 62 MAX+ IR Thermometer

Saturday, January 25, 2014

FILTER BOX ADDITION AND IMPROVEMENTS

Having gone through treating lateral line inflammation in two of my ranchus, I finally took David Lains' (Ichthius) advice (GoldfishGarage), who is a fish guru and very generous in sharing his knowledge, and purchased a UV sterilizer. Another improvement suggested by David was a 150 micron nylon filter bag to trap solids pumped from the pond. I previously used pre-filter pads, which would easily clog and were somewhat restricting water flow. Here is my old post about the set up "Before the Fish"
                                                                                                                                                             
Filter Box before
Redesigned Filter Box

To implement the changes I had to redesign my filter box. In most situations, the UV sterilizer is placed in-line after the filter and before the pond. In my case it was not possible as water from the filter box flows directly into the pond with no space to attach the UV sterilizer in between. So, I turned the last section of the filter box from which water enters the pond into UV sterilizing chamber.


The filter box is made out of transparent acrylic, and my first step was to block the UV light from effecting the rest of the sections, where bio media is placed with cultures of nitrifying bacteria. I used opaque black acrylic and UV resistant and fish safe Life Guard Pool & Pond paint to block the UV light from the chamber. Then, I installed a 18 Watt Emperor Advanced UV Sterilizer for Savio Compact Skimmer. 


18 Watt Emperor Advanced UV Sterilizer for Savio Compact Skimmer

150 micron nylon filter bag 

It is now up and running! I am glad I did it, one extra measure to keep the water cleaner and my ranchu healthier.