HIGH RANCHU MON

HIGH RANCHU MON
Art by Alexander Vasiljev, Copyright © 2020

HIGH RANCHU STORE - AZAYAKA RANCHU FOOD

Showing posts with label Set up. Show all posts

Tuesday, September 19, 2017

A WAY TO RAISE RANCHU ● CONTAINERS FOR RAISING RANCHU


Concrete Pond

Concrete has been a long time favorite material for building traditional ranchu ponds. Common sizes are 6.6 ft x 6.6 ft x 10in (2m x 2m x 25cm) and 5ft x 5ft x 10in (1.5m x 1.5m x 25cm). Square size is easy to arrange in succession, maintain and clean.

In the past, there was an indentation made on the bottom of the pond in the shape of a square, for collecting and removing of debris and for the fish to be kept during the water change. Also, there was a white tile placed on the bottom of the pond to determine translucency and color of the green water. However, nowadays, these features are not used.


Fiberglass or Polyethylene Pond

These materials are strong and durable and are commonly used in modern days and have good qualities for thermal insulation. Although, if the walls are too thin the pond might get deformed under the water weight.


Plastic Pond 

Any large plastic container, e.g. cement mixing tub or children’s pool, etc, can be used, as long as it's depth is between 9-12in (22 - 30cm). These containers are durable, cheap and come in different sizes, shapes and colors. Quite suitable for raising fry and young ranchu.


Pond Liner

It is a good option for DIY and can be used to create pond of any size and shape. Although, it is more prone to leaks.

_________________________________________________________________________________

Links to published chapters:

● INTRODUCTION
● WATER
● NOTES ON GREEN WATER & WATER CHANGE
● WATER TEMPERATURE
● AERATION
● SUNLIGHT AND SHADE
● CONTAINERS FOR RAISING RANCHU
● FOOD
● FEEDING REGIMENT
● BREEDING & SPAWNING
● RAISING & GROOMING FRY
● GROOMING KUROKO AND TOSAI
● CULLING
● SELECTION METHODS
● CULLING ROUND - I
● CULLING ROUND - II
● CULLING ROUND - III
● CULLING ROUND - IV
● CULLING ROUND - V
● FORSEEING RANCHU CHANGES IN THE FUTURE

_________________________________________________________________________________


Sunday, September 17, 2017

A WAY TO RAISE RANCHU ● SUNLIGHT AND SHADE

Sunlight

It is necessary to have at least 3 hours of sunlight a day. Sunlight is very important for a healthy ranchu and aids in brighter colors and it is instrumental for photosynthesizing phytoplankton and wall algae growth, sustaining healthy environment. As a positive side effect, sunlight's ultraviolet rays are anti-bactericidal. Watch for ranchu getting too stimulated by sunlight, as excessive swimming may weaken their tail tension, especially when young.


Shading

Strong direct sunlight can cause deterioration of ranchu physical condition and with water depth of only 6-10 in (15-25 cm) the pond can get easily overheated. It is important to shade the pond if water temperature rises near or above 86 F (30°C). However, avoid excessive shading, as it reduces the sense of seasons in ranchu.

Cheese cloth, synthetic shade cloth or bamboo/reed blinds can be used to shade the pond. It is suggested to position shading material 6.6 ft (2 m) above the water surface to provide sufficient ventilation and gas exchange.

_________________________________________________________________________________

Links to published chapters:

● INTRODUCTION
● WATER
● NOTES ON GREEN WATER & WATER CHANGE
● WATER TEMPERATURE
● AERATION
● SUNLIGHT AND SHADE
● CONTAINERS FOR RAISING RANCHU
● FOOD
● FEEDING REGIMENT
● BREEDING & SPAWNING
● RAISING & GROOMING FRY
● GROOMING KUROKO AND TOSAI
● CULLING
● SELECTION METHODS
● CULLING ROUND - I
● CULLING ROUND - II
● CULLING ROUND - III
● CULLING ROUND - IV
● CULLING ROUND - V
● FORSEEING RANCHU CHANGES IN THE FUTURE

_________________________________________________________________________________

Friday, September 15, 2017

A WAY TO RAISE RANCHU ● AERATION

Adequate aeration is important in supplying water with oxygen. It also aids in better water circulation and equalizes temperature between different layers in the pond.

However, vigorous aeration can have a negative impact on developing ranchu, especially their tale formation. It is very important to bring aeration to its minimum or avoid it all together during eggs hatching and fry development and, when the tail starts to form and open.

Advantages of aeration:
  • supply of oxygen to the water 
  • release of carbon dioxide from the water 
  • mixes water for more uniform water temperature 
  • delays deterioration of the water quality 

Drawbacks of aeration:
  • too much aeration loosens the tail tension and effects its shape 


Oxygenation And Water Surface 

Pond surface is important for oxygenation. If covering or shading the pond, attention should be paid not to obstruct the airflow and gas exchange. It is necessary to provide good ventilation if the pond is inside or when air temperatures are high.


The Amount of Dissolved Oxygen And Water Temperature

There are two factors that effect how much oxygen is dissolved in the water: temperature and pressure.

With shallow pond used for ranchu, water pressure does not have much effect. The amount of dissolved oxygen will primarily depend on increase or decrease in temperature. As a rule, with temperature increase the amount of dissolved oxygen will proportionally decrease:

  • 32 F (0°C) - 14.16 ml/L 
  • 34 F (1°C) - 13.77 ml/L 
  • 41 F (5°C) - 12.37 ml/L 
  • 50 F (10°C) - 10.92 ml/L 
  • 59 F (15°C) - 9.76 ml/L 
  • 64 F (18°C) - 9.18 ml/L 
  • 68 F (20°C) - 8.84 ml/L 
  • 77 F (25°C) - 8.11 ml/L 
  • 86 F (30°C) - 7.53 ml/L 

In the summer, due to higher temperatures water oxygen levels are at their lowest. Ranchu requires more oxygen in the summer, as it is most active. If there is a lack of oxygen in the water, ranchu will be swimming “nose up” at the surface gasping for air. Sufficient aeration is required, as well as the appropriate stocking density.


Oxygenation And Green Water

Phytoplankton in green water photosynthesizes and supplies oxygen to the water. When water gets over saturated with dissolved oxygen, it starts to escape in the form of gas. So called “gas bubble disease” may occur, when oxygen gas bubbles appear in the fish bloodstream and become visible on gills, fins and eyes. It can cause a secondary infection or even be fatal.

When using green water, additional aeration may not be necessary. Still, keep an eye on oxygen level becoming too low.

_________________________________________________________________________________

Links to published chapters:

● INTRODUCTION
● WATER
● NOTES ON GREEN WATER & WATER CHANGE
● WATER TEMPERATURE
● AERATION
● SUNLIGHT AND SHADE
● CONTAINERS FOR RAISING RANCHU
● FOOD
● FEEDING REGIMENT
● BREEDING & SPAWNING
● RAISING & GROOMING FRY
● GROOMING KUROKO AND TOSAI
● CULLING
● SELECTION METHODS
● CULLING ROUND - I
● CULLING ROUND - II
● CULLING ROUND - III
● CULLING ROUND - IV
● CULLING ROUND - V
● FORSEEING RANCHU CHANGES IN THE FUTURE

_________________________________________________________________________________


Monday, September 4, 2017

A WAY TO RAISE RANCHU ● WATER TEMPERATURE

Ranchu Body Temperature

Ranchu are ectothermic animals, which means their body temperature matches the temperature of the environment. They are also eurythermal, meaning that they are able to tolerate a wide range of temperatures. Depending on the environmental conditions, ranchu will adjust their metabolism.

Optimal temperature for ranchu active growth is between 64-86 F (18-30°C). As the water temperature rises above 86 F (30 C), ranchu activity becomes suppressed, negatively impacting their development. When the temperature drops below 64 F (18 C), ranch's metabolism begin to slow down. Below 43 F (6 C), ranchu enter a hibernation state. Cold temperatures, however, are part of ranchu's natural life cycle and are beneficial. As a temperate climate fish, ranchu enjoy all four seasons.


Temperature Fluctuations

Ranchu is adaptable to a wide temperature range, but only if the temperature changes gradually. It is best if the temperature increases no more then 1.8 F (1°C) degrees per day. A sudden increase of 9 F (5°C) degrees can be lethal, especially for fry and young fish. In an emergency, if the water temperature must be increased quickly, for disease treatment, it has to be done in increments of no more than 4-5 F (2-3°C) degrees per day until the desired temperature is reached. Decreasing the temperature is much better tolerated by the fish, but a gradual change is best.

It is important that the water temperature difference between early morning and noon fluctuates no more than 18 F (10 C) degrees. If it exceeds that - shading, ventilation or a bigger container is required.


Ranchu Activity & Water Temperature 

The range of water temperatures suitable for ranchu is between 30 and 100 F (-1 to +38°C). However, each temperature level dramatically effects the fish's physiology:
  • 32-43 F (0-6°C) - full hibernation state, ranchu are inactive
  • 44-54 F (7-12°C) - semi-hibernation, physiological functions are slow
  • 55-64 F (13-18°C) - intermediate state between hibernation and active state; physiological functions are not up to their fullest 
  • 65-75 F (19-24°C) - fish is ready to spawn, gonads develop; pathogens become more active 
  • 76-86 F (25-30°C) - active fish growth 
  • 87-97 F (31-36°C) - fish growth supressed 
  • 98-100 F (37-38°C) - upper water temperature limit for ranchu 
  • above 100 F (38°C) - temperature is NOT suitable for ranchu 


Use of Heater 

Although, a heater isn't necessary for day-to-day ranchu keeping, it might be useful in some situations. For the most part, breeders use it to adjust spawning time, to incubate ranchu eggs and to control the beginning stages of ranchu fry. A heater can also be used to aid in treating some diseases.

Advantages:
  • setting water temperature as desired 
  • controlling to big of a temperature fluctuation during the day 
  • to interrupt hibernation 
  • adjusting spawning season 
  • adjusting hatching date and promote fry growth 
  • increase disease treatment outcome 

Drawbacks:
  • difficult to keep the same water temperature during water changes 
  • lack of four season temperatures may lead to obesity 
  • temperatures that are kept the same, lead to more rapid water quality deterioration 
  • electrical bill
________________________________________________________________________________

Links to published chapters:

● INTRODUCTION
● WATER
● NOTES ON GREEN WATER & WATER CHANGE
● WATER TEMPERATURE
● AERATION
● SUNLIGHT AND SHADE
● CONTAINERS FOR RAISING RANCHU
● FOOD
● FEEDING REGIMENT
● BREEDING & SPAWNING
● RAISING & GROOMING FRY
● GROOMING KUROKO AND TOSAI
● CULLING
● SELECTION METHODS
● CULLING ROUND - I
● CULLING ROUND - II
● CULLING ROUND - III
● CULLING ROUND - IV
● CULLING ROUND - V
● FORSEEING RANCHU CHANGES IN THE FUTURE

_________________________________________________________________________________

Friday, September 1, 2017

A WAY TO RAISE RANCHU ● NOTES ON GREEN WATER AND WATER CHANGE

There is an old Japanese saying “Ranchu is made with green water”. When viewed under the microscope, green water is composed of plankton - microscopic animals, green algae, cyanobacteria (blue-green “algae”) and diatoms (brown-golden algae), which freely float in the body of water that is exposed to sunlight. Plankton is rich in protein, minerals and vitamins.

Green water isn't always used for ranchu, in fact, most modern ranchu keepers will not encourage green water. However, if the ranchu pond is exposed to bright sunlight (especially outdoors) and warm temperatures, it most likely will develop green water. If you decide to explore the green water method, then this chapter is for you.

The effects of green water on ranchu:
  • anorexigenic - fish has less appetite for additional food, due to constant feeding on plankton; reduce amount of given food 
  • motor inhabitory suppression - fish growth less lengthwise and tend to become rounder and bulkier 
  • green water holds temperature better with less fluctuation 
  • improves physical condition of the fish 
  • improves color of the fish

Color of Green Water
 
It takes experience to master green water. This method will require much more attention from the keeper to monitor the condition of water. There are two types of green water - green and brown in color, both have equal effect. Both types are often seen when the temperatures start to drop. The green or brown color of the water is determined by the balance of microorganisms.


Signs of Green Water Quality Deterioration

One of the signs of declining water quality is the formation of bubbles from aeration on the surface of the water. If the bubbles form a circle greater then 2 ft (60 cm) in diameter, it indicates that the water quality is deteriorating. When green water is used, one must observe how dark and opaque it gets. It must be kept similar to the transparency of Japanese green leaf tea (not matcha æŠ¹èŒ¶ - ceremonial green tea). If green water suddenly changes in color or opacity, or CLEARS - 100% water change is necessary as soon as possible. Green water deterioration can occur rapidly and needs a quick response, or the fish will suffer. Overfeeding is often the cause of this. 

Signs of water deterioration:
  • aeration bubbles are spread over 2 ft (60 cm) in diameter 
  • green water darkens rapidly or clears 
  • fish develops gas bubbles disease

Green Water Changes 

Best if water change is done in the morning on a sunny day. If tap water is used, it needs to be conditioned before use.

Temperature and water change proportions of green and fresh water:
  • 32-54 F (0-12°C) - only replenish what was evaporated 
  • 55-64 F (13-18°C) - when water deteriorates, use half old and half fresh water 
  • 65-75 F (19-24°C) - when water deteriorates, use a little of old water and mostly fresh water 
  • 76-97 F (25-36°C) - when water deteriorates, change 100% for fresh water 
  • 98-100 F (37-38°C) - upper limit of the water temperature for ranchu, shade the pond 
  • above 100 F (38°C) - temperature is NOT suitable for ranchu

Historically, there would be a white tile placed on the bottom of a ranchu pond. The ranchu master would then decide on the water change, based on how bright or muted the white tile would get.


Effect of Green Water Changes On Ranchu Appearance

100% water change increases ranchu activity and appetite. With frequent 100% water changes, fish will actively grow in length and the head-growth development will be slower. Also, the scale development may not keep up with the rate of growth, resulting in irregular scaling and color disadvantages. 

If the infrequency of 100% water changes is decreased, the fish will be less active and have less appetite, as the water "ages". Ranchu will grow less in length, encouraging development of the head-growth. It will also help to set finer scales.

Warning: Keeping ranchu in old water for too long may stunt the young ranchu and result in sickness.

When water changes increase:
  • fish is active, increased appetite 
  • fish grows in length 
  • head-growth is poor 
  • uneven scales development can occur 
  • tail may fold 

When water changes decrease:
  • fish activity is reduced and appetite decreased 
  • growth in length is suppressed 
  • head-growth develops 
  • scales are finely set 
  • due to less movement, tail will not fold 

This is also applies, when no green water method is used. Whether green water is used or not, balancing the time that ranchu spend in fresh and old water will affect the fish appearance. This alone, might be one of the most important conditions in raising traditional Japanese top view ranchu!

_________________________________________________________________________________

Links to published chapters:

● INTRODUCTION
● WATER
● NOTES ON GREEN WATER & WATER CHANGE
● WATER TEMPERATURE
● AERATION
● SUNLIGHT AND SHADE
● CONTAINERS FOR RAISING RANCHU
● FOOD
● FEEDING REGIMENT
● BREEDING & SPAWNING
● RAISING & GROOMING FRY
● GROOMING KUROKO AND TOSAI
● CULLING
● SELECTION METHODS
● CULLING ROUND - I
● CULLING ROUND - II
● CULLING ROUND - III
● CULLING ROUND - IV
● CULLING ROUND - V
● FORSEEING RANCHU CHANGES IN THE FUTURE

_________________________________________________________________________________


Sunday, August 27, 2017

A WAY TO RAISE RANCHU ● WATER


Tap Water

Tap or municipal water has pretty stable quality and good amount of oxygen. However, it needs to be treated for chlorine and/or chloramine. If left untreated, it is deadly for the fish. Please read here about the water conditioners. Depending on the region, tap water can be too soft and needs to be buffered and pH adjusted.


Well Water

In general, well water is not suitable for ranchu as it pumped out straight from the ground. It is often depleted of oxygen and can be too hard. A lab test can be performed to determine water composition. As a benefit, however, well water contains minerals and calcium that aids in skeletal development. It was observed that tail tension develops well in hard water, but it will slow down general growth of the fish, as compared with softer water. 

If using well water, for the best results, it can be mixed with tap water and aerated for at least overnight. In some set ups, water that is pumped out of the ground goes through the aerator tank. In this case it contains some oxygen and can be used for ranchu right away, considering that there are airstones in the ranchu pond. Read more here.


River or Lake Water

This water is not recommended for keeping ranchu. It may contain pathogens and parasites that can harm ranchu.


Green Algae Growth On The Surfaces Of The Pond

Green algae is a great food source for foraging ranchu. It is also where plankton lives. When green algae cover walls and bottom of the pond, they create a darker background to which fish reacts by developing a darker and richer color as a camouflage. It is believed that green algae growth is almost equally effective as use of green water. Benefits of green algae growth:

  • a place where plankton develops 
  • as a food rich in protein, vitamins and minerals 
  • pro-kinetic effect increases gastrointestinal activity 
  • positive for overall physical condition 
  • effecting fish color and its darkness 
  • promotes development of muscle tissue 


Cleaning the Pond


Algae growth on walls and bottom of the pond is beneficial to ranchu. Do not strip it all at once. Alternate cleaning of walls with cleaning of bottom to keep some of the algae growing at all times.

Clean the pond by brushing the walls and the bottom when algae growth gets too thick. Rinse the pond between cleanings. Read more here about the algae growth.


_________________________________________________________________________________

Links to published chapters:

● INTRODUCTION
● WATER
● NOTES ON GREEN WATER & WATER CHANGE
● WATER TEMPERATURE
● AERATION
● SUNLIGHT AND SHADE
● CONTAINERS FOR RAISING RANCHU
● FOOD
● FEEDING REGIMENT
● BREEDING & SPAWNING
● RAISING & GROOMING FRY
● GROOMING KUROKO AND TOSAI
● CULLING
● SELECTION METHODS
● CULLING ROUND - I
● CULLING ROUND - II
● CULLING ROUND - III
● CULLING ROUND - IV
● CULLING ROUND - V
● FORSEEING RANCHU CHANGES IN THE FUTURE

_________________________________________________________________________________


Thursday, September 8, 2016

A NEW CHAPTER BEGINS

It has been a long time since I've posted here. So, I thank you for your patience and understanding! I missed talking and sharing about my ranchu too.

But there were priorities. My new home required many hours of fixing and building and improving, before I could start thinking of my ranchu proper accommodations. It took a little over six months to finally come around to build a permanent display pond for my fish!

Here is what I have accomplished so far. After the screened aluminum cage with a solid roof was erected, and the deck with decorative walls were built, the final steps of ranchu display pond were as follows:

The deck was constructed with a step to accommodate the existing 8ft x 2ft x 1ft (2.4m x 61cm x 30cm) fiberglass pond. Deck step allowed me to have the pond recessed for a more pleasant display.   


Now, the drain. Previously, I have used a pump to move the water in and out of the pond. This time, I wanted to install a drain and let gravity do the job. My objectives were to have the drain that could be SECURELY plugged and to use the simplest plumbing possible. After much deliberation, I ended up with purchasing five components: 
  • heavy duty garden hose 
  • nozzle
  • ¾ garden hose to ¾ NPT brass coupler
  • bulkhead fitting 
  • rubber plug


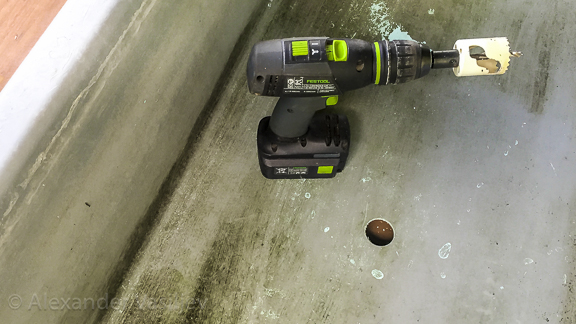
After the hole in the fiberglass pond was drilled, I fitted it with the bulkhead assembled with a brass coupler.


The garden hose was attached to the coupler underneath the pond and threaded through the hole left in the screened cage concrete header. 


Finally, the moment I had been waiting for - to fill the pond with water and let the ranchu into their new home!


Here are a few comments and technical details. Due to under one inch (2.5 cm) garden hose diameter and less than two feet high gradient between the bottom of the pond and the draining ground, the time to empty the pond with its over 115 gal (435 l) of water is lengthy, about 45 to 50 min. But not a big trade off considering that the drain assembly is super simple, super reliable and very easy to fix. For my display pond I perform 100% water change every two weeks, as I still use bio filtration and a UV lamp. 

On the other hand, to fill back the pond is a breeze. The water comes from the well and as soon as the pond is full the ranchu are in. No additional chemicals are used and the temperature of freshly pumped water is within 1-2 degrees of the water temperature in the tub. In addition, my well water is first pumped in to an aerator and gets infused with some oxygen, further I turn up the air pump during the filling. So far, I haven't noticed any visual distress when the ranchu enter fresh water. The deck and the pond are under the solid roof that deflects heat and protects from direct rain, and since the screened cage is opened on all three sides, there is a plenty of breeze to cool the summer heat. Water temperature stays below 83F (28C) even when the air temperature soars well above 90F (32C).  

I have more improvements on the way and of course I have to start and finish the fishery, BY FEBRUARY! It is going to be a separate structure with a series of ponds and a culling station. But for now, I can take a short brake and enjoy my ranchu peacefully swimming in their new home! The new chapter has began!


Thursday, May 14, 2015

VISIT TO TG RANCHU IN BANGKOK, THAILAND - PART I

PART I

Jun Luk, my friend and neighbor ranchu fellow, and I had a privilege of visiting ranchu master Nuttavut Prueksiri (aka Aor) in Bangkok, Thailand. Many thanks to Jun for setting up and coordinating this visit. Aor's ranchu business is known under the name of TG Ranchu (Facebook page - TG Ranchu, YouTube - aortaoaortao). 

Having returned from a long flight the morning of our visit, Aor was very kind to show us around his farm and his work with ranchu. Energetic and with a great sense of humor, Aor is fun to spend time with and have conversation. During a few hours of our visit, we learned and shared a lot about the ranchu.


Aor is posing proudly in front of his trophy wall.
I think, it is time for a bigger wall. Not all of Aor's trophies could fit here.

Jun and I couldn't resist posing next to Aor and his trophies.

My first impression of the place - how perfectly organized everything is. Aor employs a traditional Japanese method for raising and grooming ranchu. Fiberglass tubs of different sizes are used to house his ranchu. The tubs are protected from the sun by the overhead shades and by the net enclosure from the hungry birds and such.


Aor is a mentor and promoter of top view ranchu. It is amazing how readily and eagerly he shares his vast knowledge and experience. He is also a ranchu judge.


Inspecting the quality of one of Aor's nisai ranchu

Hand spawning demonstration

Here are some Q&A with Aor regarding his grooming techniques:

Q: How often do you change water?
A: Every four days.

Q: How does your "new" water get prepared?
A: Tap water is collected in the cistern and aerated for 1-2 days. No chemicals or dechlorinators are used. The fresh water is pumped from the cistern to the tubs.

Q: Do you use "green water" and if you do for what reason?
A: No, In my opinion, temperature in Thailand is not proper to use green water.

Q: What is the feeding regiment for BBR and CBR?
A: To develop funtan and keep up with rapid growth - five feeding per day, three of which with bloodworms and two with pellets.

Q: What brand(s) of pellets do you use?
A: Saki Hikari

Q: Is there any other supplemental food given to your ranchu?
A: Watermeal, aka Swamp Algae or Wolffia.

Q: Is feeding regiment different for your nisai and oya fish?
A: For younger ranchu I feed more often with high protein food. For nisai and oya the same feeding regiment.

Q: Do you use any prophylactic drugs or treatments for your ranchu?
A: In case they get sick only.


TO BE CONTINUED ... 


Wednesday, August 13, 2014

BIO FILTER RETHOUGHT

Having started with a DIY bio filter located in the separate tank (see "Before The Fish") and understanding more on how it works, I later added a UV sterilizer and a fine filter bag to further improve the quality of my water (see "Filter Box Additions And Improvements").

Although, the filtering system have been working perfectly, apart from an accident caused by not cleaning it often enough (see "Distracted, You Must Not Be"), I have been thinking about simplifying my filtration process. I was also looking to reduce additional maintenance apart from 100% water changes. So, I came up with a different design. The new filter design ended up to be a combination of submerged "canister filter" and bakki shower, used in koi ponds.

I started up with making an acrylic box to fit the pond's width. The box is only 3.5 in (9 cm) wide measured inside and 11 in (28 cm) high to fit in 12 in (30.5 cm) high pond. The front and back walls of the box were not joint with the bottom, leaving spaces for the water to escape.


I filled the box with layers of media - Eheim Substrate Pro in the bag on the bottom, followed by Matala black matt, followed by Bio House Cylinders covered with another layer of Matala black matt. All media has a tremendous surface area for beneficial bacteria to grow.


Front side view

Bio House filter media cylinders are made from mineral stones and silica


I placed my new bio filter in the pond and left the to "seed" with beneficial bacteria for three weeks, after that, I could safely replaced my old filtering system with the new one. So, how it works?

On one side of the pond, I placed submergible pump with pre-filter sponge intake to move water through the UV sterilizer to my submerged bio filter box.  


Set up top view


Water than is sprayed on top of the filter, floats down and exits at the bottom of the filter box. Simple.


Here are the benefits I find so far. Due to the wide opening on the bottom of the filter box, where the water escapes, the flow is very gentle and the water is almost still, although it is pumped at 600-700 gph (2500-2650 lph). A big improvement from my previous design. Next, the cleaning has become much more simple. The filter box is accessible from above and the media can be pulled out easily and rinsed in the same pond water before 100% water change, making it a breeze. Having major parts of the filtering system inside the pond have minimized the danger of water leak. I also see a huge esthetic benefit. Freeing the space from 30 x 12.5 x 24 in (76 x 32 x 61 cm) box on the side of my pond in my small apartment is a big deal.

Subsequently, with this change, I lost an extra 30 gal (113 L) of water and 4 in (10 cm) of pond's length. Though, the loss in length is not that important, considering 8 ft (2.4 m) long pond.


After placing the filter box inside the pond, I found gaps on three sides of the filter box due to pond's curved angles. Knowing that my ranchu will venture into these narrow spaces, I filled them with Matala mats, adding more bacteria friendly surface. To avoid stale water between the back wall of the filter box and the wall of the pond, I installed four air stones for circulation. Also, the gap is large enough to place an extra bag with bio media, as seen in the image below. In which case, the water is moved through the media by air bubbles.


All it left, was a cover to make, concealing the filter and voila! 


Tuesday, May 6, 2014

TIMELY MOVE

It is time to give fast developing ranchu fry more room. Right stocking density is crucial for grooming healthy and well shaped fry. At this stage, when the fry is around 1/2 inch (1.5 cm) no more than 100 per 3.3 sq.ft (1 sq.m) is appropriate. As the fry grows the stocking density must be adjusted. Again, since my set up is quite minimalistic and I do not have room for more water containers, I used my 120 gal (454 L) pond to accommodate the next project - a larger size nursery for the ranchu fry.

All it took was four bamboo sticks, four rubber bands and a 400 micron mesh to make a net. The net was suspended from the bamboo frame in the pond, keeping the water depth inside the nursery of 4-5 inches (10-13 cm). I added an airstone and a hose to constantly supply clean water to the nursery, pumped from the UV sterilizer (see my previous post "Filter Box Addition and Improvements"). Water pours from the hose into a "diffuser", a bunched up fine mesh, to keep the water movement to a minimum.

Since newly hatched brine shrimp size is up to 400 microns, I chose 400 microns mesh to keep them from escaping. Any finer mesh would get clogged more often with algae and the rest of the derbies.


Saturday, April 19, 2014

THE RANCHU FRY NURSERY SET UP

Tomorrow the fry will begin swimming around and I will be transferring them to a nursery. Due to my unique situation, having the pond in my apartment and no available space for any other water bearing container, I had to think hard and out of the box to come up with my set up. The basic idea is to keep the nursery tub suspended on two bamboo sticks above the main pond. The water will gently flow through the nursery tub into the pond.

I placed a small pump inside the UV chamber of the filter box (see my previous post on Filter Box Addition and Improvements) to divert some sterilized and ammonia/nitrite free water from the main pond into the nursery tub. I used 12 Qt (11.4 L) household tub, in which I cut out a slit for water overflow. This way the water depth will be constant at 4.5 in (11 cm). I covered the front of the slit with fine nylon mesh, glued to the walls with a 100% GE Clear Silicone I caulk and placed a filter sponge passed that to fill the slit.


Nursery tub suspended on two bamboo sticks above the main pond

Water hose delivers water from the UV chamber of the outside filter box

Water flow was further minimized with a drinking straw

Filter sponge is placed in the overflow slit to prevent any fry from escaping 


I payed attention to the strength of the water flow inside the nursery tub. The ranchu fry are not the best swimmers yet and can not fight any water current. So, in addition to lowering the pump's flow rate to a minimum of less than 30 gal/hr (114 L/hr), I inserted a drinking straw inside the ½ inch (1.3 cm) water hose to further reduce the flow to about 4 gal/hr (15 L/hr) or less. By lifting the straw up or down, I can control the flow. As the fry will be transferred into the nursery tomorrow, I will be watching closely the effects of this set up on their development. As always - observe, learn and improve.

If it all works, a huge benefit will be to not have to change water directly in the nursery tub, which disturbs fragile fry. Although, since I circulate the same water in the nursery tub and the main pond, my weekly 90% water changes in the main pond will be done regularly. Another positive outcome of this set up is a constant flow of clean and ammonia/nitrite free water that has just passed through bio-filter and UV chamber of the filter box.

I am certain, I will be making more modification to this set up as I learn more from little ranchu fry. 


Wednesday, February 26, 2014

CONSISTENCY

The most important secret in goldfish keeping is CONSISTENCY. Ranchu, as most goldfish, are strong and adaptable to a variety of water chemistry and temperatures. However, it is often a mistake to chose one set of "ideal" parameters, as recommended in common literature and try to change exciting water chemistry to those standards. For example, shifting pH and what is even more difficult keeping it at a certain level. Obviously, complete understanding of water chemistry is necessary - pH, hardness, buffering capacity, nitrate cycle, etc. But more important here is to recognize the acceptable range of parameters present in the current water and keep them stable within the range. This will provide needed consistency.

In my case, the tap water is well buffered but more alkaline, with pH ranging between 8.1 and 8.2. The ranchu adapted to this pH and will be doing fine, as long as I will maintain consistency. At this higher pH level, however, ammonia becomes more toxic and even small traces of it can be stressful on fish. So, my attention was given to building a sufficient bio-filter, that has been doing a great job so far in keeping the ammonia and nitrite levels at their lowest. Weekly 90% water changes further reduce nitrates and thus my water parameters are kept stable.

I acquired a couple of new gadgets to help me to monitor the water. One is a digital pH meter, that instantly reads pH and gives me an idea about the overall stability. Another gadget is a digital infrared thermometer that I use during the water changes and to help me to decide on the amount and frequency of food while temperatures fluctuate. It is instant accurate and very convenient. One thing to remember with infrared thermometers however, is that they ONLY read temperature of the surface. I usually take readings of the surface that is agitated by the air bubbles.


EcoTestr pH2 by Oakton
Fluke 62 MAX+ IR Thermometer

Saturday, January 25, 2014

FILTER BOX ADDITION AND IMPROVEMENTS

Having gone through treating lateral line inflammation in two of my ranchus, I finally took David Lains' (Ichthius) advice (GoldfishGarage), who is a fish guru and very generous in sharing his knowledge, and purchased a UV sterilizer. Another improvement suggested by David was a 150 micron nylon filter bag to trap solids pumped from the pond. I previously used pre-filter pads, which would easily clog and were somewhat restricting water flow. Here is my old post about the set up "Before the Fish"
                                                                                                                                                             
Filter Box before
Redesigned Filter Box

To implement the changes I had to redesign my filter box. In most situations, the UV sterilizer is placed in-line after the filter and before the pond. In my case it was not possible as water from the filter box flows directly into the pond with no space to attach the UV sterilizer in between. So, I turned the last section of the filter box from which water enters the pond into UV sterilizing chamber.


The filter box is made out of transparent acrylic, and my first step was to block the UV light from effecting the rest of the sections, where bio media is placed with cultures of nitrifying bacteria. I used opaque black acrylic and UV resistant and fish safe Life Guard Pool & Pond paint to block the UV light from the chamber. Then, I installed a 18 Watt Emperor Advanced UV Sterilizer for Savio Compact Skimmer. 


18 Watt Emperor Advanced UV Sterilizer for Savio Compact Skimmer

150 micron nylon filter bag 

It is now up and running! I am glad I did it, one extra measure to keep the water cleaner and my ranchu healthier.