
But there were priorities. My new home required many hours of fixing and building and improving, before I could start thinking of my ranchu proper accommodations. It took a little over six months to finally come around to build a permanent display pond for my fish!
Here is what I have accomplished so far. After the screened aluminum cage with a solid roof was erected, and the deck with decorative walls were built, the final steps of ranchu display pond were as follows:
The deck was constructed with a step to accommodate the existing 8ft x 2ft x 1ft (2.4m x 61cm x 30cm) fiberglass pond. Deck step allowed me to have the pond recessed for a more pleasant display.


Now, the drain. Previously, I have used a pump to move the water in and out of the pond. This time, I wanted to install a drain and let gravity do the job. My objectives were to have the drain that could be SECURELY plugged and to use the simplest plumbing possible. After much deliberation, I ended up with purchasing five components:
- heavy duty garden hose
- nozzle
- ¾ garden hose to ¾ NPT brass coupler
- bulkhead fitting
- rubber plug


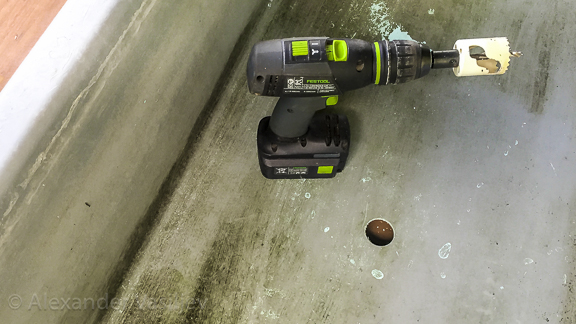
After the hole in the fiberglass pond was drilled, I fitted it with the bulkhead assembled with a brass coupler.

The garden hose was attached to the coupler underneath the pond and threaded through the hole left in the screened cage concrete header.

Finally, the moment I had been waiting for - to fill the pond with water and let the ranchu into their new home!


Here are a few comments and technical details. Due to under one inch (2.5 cm) garden hose diameter and less than two feet high gradient between the bottom of the pond and the draining ground, the time to empty the pond with its over 115 gal (435 l) of water is lengthy, about 45 to 50 min. But not a big trade off considering that the drain assembly is super simple, super reliable and very easy to fix. For my display pond I perform 100% water change every two weeks, as I still use bio filtration and a UV lamp.
On the other hand, to fill back the pond is a breeze. The water comes from the well and as soon as the pond is full the ranchu are in. No additional chemicals are used and the temperature of freshly pumped water is within 1-2 degrees of the water temperature in the tub. In addition, my well water is first pumped in to an aerator and gets infused with some oxygen, further I turn up the air pump during the filling. So far, I haven't noticed any visual distress when the ranchu enter fresh water. The deck and the pond are under the solid roof that deflects heat and protects from direct rain, and since the screened cage is opened on all three sides, there is a plenty of breeze to cool the summer heat. Water temperature stays below 83F (28C) even when the air temperature soars well above 90F (32C).
I have more improvements on the way and of course I have to start and finish the fishery, BY FEBRUARY! It is going to be a separate structure with a series of ponds and a culling station. But for now, I can take a short brake and enjoy my ranchu peacefully swimming in their new home! The new chapter has began!

No comments:
Post a Comment