HIGH RANCHU MON

HIGH RANCHU MON
Art by Alexander Vasiljev, Copyright © 2020

HIGH RANCHU STORE - AZAYAKA RANCHU FOOD

Showing posts with label Water quality. Show all posts

Monday, October 16, 2017

A WAY TO RAISE RANCHU ● RAISING AND GROOMING FRY

Keep A Diary

Write down everything that has to do with breeding and progress of your ranchu. Documenting when and what is a good practice and creates an important database for your future reference.


Water Temperature During Hatching

68 F (20°C) is optimal water temperature for developing fertilized eggs. If the temperature is lover, fry will not hatch all at the same time and there will be a high percentage of malformed fish. Temperatures above 68 F (20°C) will induce egg development, resulting in higher percentage of tail regression to original "wild" carp. Controlling water temperature by shading and/or using a heater is necessary.

Water temperature and timing from spawning till hatching:
  • 57 F (14°C) - hatching on the 7th day 
  • 61 F (16°C) - hatching on the 6th day 
  • 64 F (18°C) - hatching in 5 ½ days 
  • 68 F (20°C) - hatching on the 5th day 
  • 71 F (22°C) - hatching in 4 ½ days 
  • 75 F (24°C) - hatching on the 4th day 
Watch the water quality, as it can deteriorate quickly after spawning, due to unfertilized eggs and milt remains. It is best to transfer the eggs or change water right after spawning and keep the temperature constant at 68 F (20°C). In some cases, adding drops of methylene blue helps to prevent fungal growth on ranchu eggs.


Feeding The Fry

The fry are born with a yolk sac that provides them with nutrients for a couple of days. Start feeding the fry on the 2nd day after hatching.

It is very important to provide enough food for the fry to keep up with their high growth rate. When feeding live food, the portion size is not important. The fry must eat as much as they need and any time they want. Digestion time is short. There should be a constant supply of live food, as it gets eaten from morning till evening. One of the most accessible live foods for fry is freshly hatched brine shrimp. Read more on brine shrimp here.

When feeding frozen food or micro pallets, the portion size need to be observed, as overfeeding can spoil the water fast. A single dose should be of what fry can eat in 5 min. Digestion time is longer. Intervals between feedings must reflect digestion times, but feeding must be preformed often.


Water Changes & Fry

It is very important to keep constant temperature during the water changes. Even small temperate fluctuations may weaken or kill very sensitive at this stage fry. Also, watch the aeration. Strong aeration can damage the fry, adequately adjust air pump pressure to minimize any water turbulence. 

Its best not to transfer very young fry during the water change, but scoop as much water as you can and replace it with fresh. When fry has grown a little it will handle the transfer better, still be very carful scooping it during the water change, to prevent any injury. At this time it is best to have two containers and alternate them during the water change.


Filamentous Green Algae & Fry

Due to higher stocking density and/or food left in the water, filamentous green algae or Spirogyra can grow very rapidly. This algae produces long hair-like strings and if eaten by fry will get stuck in their small bodies, coming out through the gills or vent. It can not be removed and will eventually kill the fry.

Adjusting stocking density, regular water changes and cleaning the container will keep it under control.


Growth Rate

Learn to determine proper stocking density. This will insure that the fry doesn’t die and will promote faster development. Balancing the amount of food and stocking density is important for a healthy development of the fry and to prevent a number of diseases.

It is important to make fry growing as fast as possible. For example, for the fish hatched in April, a goal would be to have the fish reaching 4 in (10 cm) in length by the fall. 

Growth rate of the fry indicating its healthy development:
  • 1st week - 3/8 in (10mm) 
  • 2nd week - 1/2 in (13 mm) 
  • 3rd week - 5/8 in (16 mm) 
  • 1st month - 6/8 in (20 mm) 
  • 7/8 in (22 mm) increase in the 2nd month - 1 5/8 in (42 mm) 
  • 1/2 in (13 mm) increase in the 3rd month - 2 1/8 in (55 mm) 
  • 5/8 in (15 mm) increase in the 4th month - 2 6/8 in (70 mm) 
  • 5/8 in (15 mm) increase in the 5th month - 3 3/8 in (85 mm) 
  • 1/2 in (12 mm) increase in the 6th month - 3 2/8 in (97 mm) 
  • 5/16 in (8 mm) increase in the 7th month - 4 1/8 in (105 mm) 
If you have achieved the above growth rates, look for more ways to improve. If you are behind these growth rates, increase one or all of the following:
  • food amount 
  • water changes 
  • adjust stocking density

Effect of Stocking Density On Tosai Ranchu

Always pay attention to stocking density for the fry in its first year. High density will cause illness in fish and delays in development. During this period you want for the fish to grow lengthwise and loosen stiffness in their tails. Do regular water changes before water spoils. Regularly remove waist and uneaten food.

High Density:
movement is restricted, high probability of gill disease, growth is slow, rapid water quality deterioration, tail shoulders and core remain hard and make it difficult to swim

Somewhat Low Density:
water quality is maintained, chances of illness are low, growth is higher in width and normal in length, competitive spirit and appetite is good, only tail core softens.

Low Density:
water may deteriorate causing illness even though it looks clean, growth in length is much suppressed, vertical growth is slower. Due to lack of competition between the ranchu, their appetite is lower, they swim less and because of that both tail shoulders and core remains stiff

Appropriate Density:
water quality is maintained, growth is accelerated in both length and width, better appetite and good competitive spirit, swims more. Both tail shoulders and core softening which helps to swim better. Adjust stocking density by culling. It is important to identify quality ranchu as early as possible to maintain appropriate stocking density. 

Appropriate ranchu count per 3.3 ft² (1 m²) container that is 4 in (10 cm) gradually increasing to 10 in (25 cm) deep:
  • up to 0.6 in (1.5 cm) long fish - up to 100
  • 0.8 in (2 cm) long fish - up to 60
  • 1 1/8 in (3 cm) long fish - up to 50
  • 1 5/8 in (4 cm) long fish - up to 40
  • 2 3/8 in (6 cm) long fish - up to 20
  • 4 in (10 cm) long fish - up to 5 

_________________________________________________________________________________

Links to published chapters:

● INTRODUCTION
● WATER
● NOTES ON GREEN WATER & WATER CHANGE
● WATER TEMPERATURE
● AERATION
● SUNLIGHT AND SHADE
● CONTAINERS FOR RAISING RANCHU
● FOOD
● FEEDING REGIMENT
● BREEDING & SPAWNING
● RAISING & GROOMING FRY
● GROOMING KUROKO AND TOSAI
● CULLING
● SELECTION METHODS
● CULLING ROUND - I
● CULLING ROUND - II
● CULLING ROUND - III
● CULLING ROUND - IV
● CULLING ROUND - V
● FORSEEING RANCHU CHANGES IN THE FUTURE

_________________________________________________________________________________


Friday, September 29, 2017

A WAY TO RAISE RANCHU ● FEEDING REGIMENT

Amount of Food & Water temperature

Ranchu's physiological functions are greatly affected by the ambient water temperature. It is very important to adjust food type and amount in accordance with the water temperature. If not fed correctly, ranchu might develop indigestion problems and their immune system may get weaken, making them prone to decease.

  • 32-43 F (0-6°C) - fish hibernate, no food is required
  • 44-54 F (7-12°C) - physiological functions are slow; give only small amount of easily digestible food
  • 55-64 F (13-18°C) - physiological functions are not to their fullest; increase the food amount carefully; use easily digestible food
  • 65-75 F (19-24°C) - fish is active, food amount must be increased 
  • 76-86 F (25-30°C)- very active growth; provide enough food, but watch for signs of obesity 
  • 87-97 F (31-36°C) - fish appetite is lower; provide appropriate amount of food
  • 98-100 F (37-38°C) - upper limit of water temperature for ranchu
  • above 100 F (38°C) - temperature is harmful for ranchu


Feeding Depends On the Weather & Seasons

Adjust amount of food according to the weather and season, especially for the fish kept outside. If the water temperature changes due to the air temperature drop or rain, reduce the amount of food. Feed 2 hrs before the rain forecast. When temperature rises back up, increase food amount.

During hot summer days feeding in the morning is preferable due to cooler water temperature. In colder seasons, when water temperature starts to drop in the afternoon, feeding late may cause indigestion. Suggested feeding times during the sunny weather for ranchu that are kept outside:

  • spring - from 7:30am till 3pm 
  • summer - from 6am to 4pm; watch for the rain that will lower water temperature; to make ranchu grow faster, give food 2 hrs before it gets dark. 
  • fall - from 7:30am till 3pm 
  • winter - at low temperatures no food is usually given; if given, should be around noon 


Amount of a Single Feeding

Ranchu has no stomach. In order to provide proper digestion time, the single food portion must be eaten within 5 min. Try to avoid food leftovers, as it will effect the water quality.


Number of Feedings

It is best to feed after previously given food has been digested. In the warm temperature you can feed as soon as previous food has been digested, up to five feedings per day for young fish, when a single portion can be eaten in 5 min. Remember different foods have different digestion times.


Feeding On the Day of Water Change

There is an old saying: “Refrain from food on the day of new water”. With a large water change the fish is stressed and its physical condition is weakened. 

“Refrain” however, doesn’t mean to completely avoid food. Right after the water change the fish' somatic nerve system is stimulated by the fresh water, making them more active. At the same time gastrointestinal function is reduced. After 30 minutes of fish being in the new water, somatic nerve system usually calms down, normalizing functions of gastrointestinal tract and releasing stress. At this time you can give a single portion.


When Fish is Not Eating

Not eating can be influenced by several factors. It is important to quickly determine what causes it and take an action:

  • fish condition - improve the way you feed, check for disease or start a treatment 
  • food quality - change the food type, change the way the food is stored 
  • water quality - watch for water quality deterioration, perform regular water changes 
  • environment - make sure water temperature is between 64-86 F (18-30°C), improve aeration and shading, adjust stocking density of the fish 

Prevention of Fish Obesity

  • moderate diet, restrain from giving too much food
  • let wall algae to grow, use green water 
  • balance wider variety of foods and use high quality pellets
  • extend interval between water changes
  • exercise fish, but care not to lose the tail tension and shape 
  • observe water temperature and seasons and adjust the food regiment accordingly
  • maintain appropriate stocking density to keep fish competitive 

_________________________________________________________________________________

Links to published chapters:

● WATER
● AERATION
● FOOD
● FEEDING REGIMENT
● CULLING

_________________________________________________________________________________


Sunday, September 17, 2017

A WAY TO RAISE RANCHU ● SUNLIGHT AND SHADE

Sunlight

It is necessary to have at least 3 hours of sunlight a day. Sunlight is very important for a healthy ranchu and aids in brighter colors and it is instrumental for photosynthesizing phytoplankton and wall algae growth, sustaining healthy environment. As a positive side effect, sunlight's ultraviolet rays are anti-bactericidal. Watch for ranchu getting too stimulated by sunlight, as excessive swimming may weaken their tail tension, especially when young.


Shading

Strong direct sunlight can cause deterioration of ranchu physical condition and with water depth of only 6-10 in (15-25 cm) the pond can get easily overheated. It is important to shade the pond if water temperature rises near or above 86 F (30°C). However, avoid excessive shading, as it reduces the sense of seasons in ranchu.

Cheese cloth, synthetic shade cloth or bamboo/reed blinds can be used to shade the pond. It is suggested to position shading material 6.6 ft (2 m) above the water surface to provide sufficient ventilation and gas exchange.

_________________________________________________________________________________

Links to published chapters:

● INTRODUCTION
● WATER
● NOTES ON GREEN WATER & WATER CHANGE
● WATER TEMPERATURE
● AERATION
● SUNLIGHT AND SHADE
● CONTAINERS FOR RAISING RANCHU
● FOOD
● FEEDING REGIMENT
● BREEDING & SPAWNING
● RAISING & GROOMING FRY
● GROOMING KUROKO AND TOSAI
● CULLING
● SELECTION METHODS
● CULLING ROUND - I
● CULLING ROUND - II
● CULLING ROUND - III
● CULLING ROUND - IV
● CULLING ROUND - V
● FORSEEING RANCHU CHANGES IN THE FUTURE

_________________________________________________________________________________

Friday, September 15, 2017

A WAY TO RAISE RANCHU ● AERATION

Adequate aeration is important in supplying water with oxygen. It also aids in better water circulation and equalizes temperature between different layers in the pond.

However, vigorous aeration can have a negative impact on developing ranchu, especially their tale formation. It is very important to bring aeration to its minimum or avoid it all together during eggs hatching and fry development and, when the tail starts to form and open.

Advantages of aeration:
  • supply of oxygen to the water 
  • release of carbon dioxide from the water 
  • mixes water for more uniform water temperature 
  • delays deterioration of the water quality 

Drawbacks of aeration:
  • too much aeration loosens the tail tension and effects its shape 


Oxygenation And Water Surface 

Pond surface is important for oxygenation. If covering or shading the pond, attention should be paid not to obstruct the airflow and gas exchange. It is necessary to provide good ventilation if the pond is inside or when air temperatures are high.


The Amount of Dissolved Oxygen And Water Temperature

There are two factors that effect how much oxygen is dissolved in the water: temperature and pressure.

With shallow pond used for ranchu, water pressure does not have much effect. The amount of dissolved oxygen will primarily depend on increase or decrease in temperature. As a rule, with temperature increase the amount of dissolved oxygen will proportionally decrease:

  • 32 F (0°C) - 14.16 ml/L 
  • 34 F (1°C) - 13.77 ml/L 
  • 41 F (5°C) - 12.37 ml/L 
  • 50 F (10°C) - 10.92 ml/L 
  • 59 F (15°C) - 9.76 ml/L 
  • 64 F (18°C) - 9.18 ml/L 
  • 68 F (20°C) - 8.84 ml/L 
  • 77 F (25°C) - 8.11 ml/L 
  • 86 F (30°C) - 7.53 ml/L 

In the summer, due to higher temperatures water oxygen levels are at their lowest. Ranchu requires more oxygen in the summer, as it is most active. If there is a lack of oxygen in the water, ranchu will be swimming “nose up” at the surface gasping for air. Sufficient aeration is required, as well as the appropriate stocking density.


Oxygenation And Green Water

Phytoplankton in green water photosynthesizes and supplies oxygen to the water. When water gets over saturated with dissolved oxygen, it starts to escape in the form of gas. So called “gas bubble disease” may occur, when oxygen gas bubbles appear in the fish bloodstream and become visible on gills, fins and eyes. It can cause a secondary infection or even be fatal.

When using green water, additional aeration may not be necessary. Still, keep an eye on oxygen level becoming too low.

_________________________________________________________________________________

Links to published chapters:

● INTRODUCTION
● WATER
● NOTES ON GREEN WATER & WATER CHANGE
● WATER TEMPERATURE
● AERATION
● SUNLIGHT AND SHADE
● CONTAINERS FOR RAISING RANCHU
● FOOD
● FEEDING REGIMENT
● BREEDING & SPAWNING
● RAISING & GROOMING FRY
● GROOMING KUROKO AND TOSAI
● CULLING
● SELECTION METHODS
● CULLING ROUND - I
● CULLING ROUND - II
● CULLING ROUND - III
● CULLING ROUND - IV
● CULLING ROUND - V
● FORSEEING RANCHU CHANGES IN THE FUTURE

_________________________________________________________________________________


Monday, September 4, 2017

A WAY TO RAISE RANCHU ● WATER TEMPERATURE

Ranchu Body Temperature

Ranchu are ectothermic animals, which means their body temperature matches the temperature of the environment. They are also eurythermal, meaning that they are able to tolerate a wide range of temperatures. Depending on the environmental conditions, ranchu will adjust their metabolism.

Optimal temperature for ranchu active growth is between 64-86 F (18-30°C). As the water temperature rises above 86 F (30 C), ranchu activity becomes suppressed, negatively impacting their development. When the temperature drops below 64 F (18 C), ranch's metabolism begin to slow down. Below 43 F (6 C), ranchu enter a hibernation state. Cold temperatures, however, are part of ranchu's natural life cycle and are beneficial. As a temperate climate fish, ranchu enjoy all four seasons.


Temperature Fluctuations

Ranchu is adaptable to a wide temperature range, but only if the temperature changes gradually. It is best if the temperature increases no more then 1.8 F (1°C) degrees per day. A sudden increase of 9 F (5°C) degrees can be lethal, especially for fry and young fish. In an emergency, if the water temperature must be increased quickly, for disease treatment, it has to be done in increments of no more than 4-5 F (2-3°C) degrees per day until the desired temperature is reached. Decreasing the temperature is much better tolerated by the fish, but a gradual change is best.

It is important that the water temperature difference between early morning and noon fluctuates no more than 18 F (10 C) degrees. If it exceeds that - shading, ventilation or a bigger container is required.


Ranchu Activity & Water Temperature 

The range of water temperatures suitable for ranchu is between 30 and 100 F (-1 to +38°C). However, each temperature level dramatically effects the fish's physiology:
  • 32-43 F (0-6°C) - full hibernation state, ranchu are inactive
  • 44-54 F (7-12°C) - semi-hibernation, physiological functions are slow
  • 55-64 F (13-18°C) - intermediate state between hibernation and active state; physiological functions are not up to their fullest 
  • 65-75 F (19-24°C) - fish is ready to spawn, gonads develop; pathogens become more active 
  • 76-86 F (25-30°C) - active fish growth 
  • 87-97 F (31-36°C) - fish growth supressed 
  • 98-100 F (37-38°C) - upper water temperature limit for ranchu 
  • above 100 F (38°C) - temperature is NOT suitable for ranchu 


Use of Heater 

Although, a heater isn't necessary for day-to-day ranchu keeping, it might be useful in some situations. For the most part, breeders use it to adjust spawning time, to incubate ranchu eggs and to control the beginning stages of ranchu fry. A heater can also be used to aid in treating some diseases.

Advantages:
  • setting water temperature as desired 
  • controlling to big of a temperature fluctuation during the day 
  • to interrupt hibernation 
  • adjusting spawning season 
  • adjusting hatching date and promote fry growth 
  • increase disease treatment outcome 

Drawbacks:
  • difficult to keep the same water temperature during water changes 
  • lack of four season temperatures may lead to obesity 
  • temperatures that are kept the same, lead to more rapid water quality deterioration 
  • electrical bill
________________________________________________________________________________

Links to published chapters:

● INTRODUCTION
● WATER
● NOTES ON GREEN WATER & WATER CHANGE
● WATER TEMPERATURE
● AERATION
● SUNLIGHT AND SHADE
● CONTAINERS FOR RAISING RANCHU
● FOOD
● FEEDING REGIMENT
● BREEDING & SPAWNING
● RAISING & GROOMING FRY
● GROOMING KUROKO AND TOSAI
● CULLING
● SELECTION METHODS
● CULLING ROUND - I
● CULLING ROUND - II
● CULLING ROUND - III
● CULLING ROUND - IV
● CULLING ROUND - V
● FORSEEING RANCHU CHANGES IN THE FUTURE

_________________________________________________________________________________

Friday, September 1, 2017

A WAY TO RAISE RANCHU ● NOTES ON GREEN WATER AND WATER CHANGE

There is an old Japanese saying “Ranchu is made with green water”. When viewed under the microscope, green water is composed of plankton - microscopic animals, green algae, cyanobacteria (blue-green “algae”) and diatoms (brown-golden algae), which freely float in the body of water that is exposed to sunlight. Plankton is rich in protein, minerals and vitamins.

Green water isn't always used for ranchu, in fact, most modern ranchu keepers will not encourage green water. However, if the ranchu pond is exposed to bright sunlight (especially outdoors) and warm temperatures, it most likely will develop green water. If you decide to explore the green water method, then this chapter is for you.

The effects of green water on ranchu:
  • anorexigenic - fish has less appetite for additional food, due to constant feeding on plankton; reduce amount of given food 
  • motor inhabitory suppression - fish growth less lengthwise and tend to become rounder and bulkier 
  • green water holds temperature better with less fluctuation 
  • improves physical condition of the fish 
  • improves color of the fish

Color of Green Water
 
It takes experience to master green water. This method will require much more attention from the keeper to monitor the condition of water. There are two types of green water - green and brown in color, both have equal effect. Both types are often seen when the temperatures start to drop. The green or brown color of the water is determined by the balance of microorganisms.


Signs of Green Water Quality Deterioration

One of the signs of declining water quality is the formation of bubbles from aeration on the surface of the water. If the bubbles form a circle greater then 2 ft (60 cm) in diameter, it indicates that the water quality is deteriorating. When green water is used, one must observe how dark and opaque it gets. It must be kept similar to the transparency of Japanese green leaf tea (not matcha æŠ¹èŒ¶ - ceremonial green tea). If green water suddenly changes in color or opacity, or CLEARS - 100% water change is necessary as soon as possible. Green water deterioration can occur rapidly and needs a quick response, or the fish will suffer. Overfeeding is often the cause of this. 

Signs of water deterioration:
  • aeration bubbles are spread over 2 ft (60 cm) in diameter 
  • green water darkens rapidly or clears 
  • fish develops gas bubbles disease

Green Water Changes 

Best if water change is done in the morning on a sunny day. If tap water is used, it needs to be conditioned before use.

Temperature and water change proportions of green and fresh water:
  • 32-54 F (0-12°C) - only replenish what was evaporated 
  • 55-64 F (13-18°C) - when water deteriorates, use half old and half fresh water 
  • 65-75 F (19-24°C) - when water deteriorates, use a little of old water and mostly fresh water 
  • 76-97 F (25-36°C) - when water deteriorates, change 100% for fresh water 
  • 98-100 F (37-38°C) - upper limit of the water temperature for ranchu, shade the pond 
  • above 100 F (38°C) - temperature is NOT suitable for ranchu

Historically, there would be a white tile placed on the bottom of a ranchu pond. The ranchu master would then decide on the water change, based on how bright or muted the white tile would get.


Effect of Green Water Changes On Ranchu Appearance

100% water change increases ranchu activity and appetite. With frequent 100% water changes, fish will actively grow in length and the head-growth development will be slower. Also, the scale development may not keep up with the rate of growth, resulting in irregular scaling and color disadvantages. 

If the infrequency of 100% water changes is decreased, the fish will be less active and have less appetite, as the water "ages". Ranchu will grow less in length, encouraging development of the head-growth. It will also help to set finer scales.

Warning: Keeping ranchu in old water for too long may stunt the young ranchu and result in sickness.

When water changes increase:
  • fish is active, increased appetite 
  • fish grows in length 
  • head-growth is poor 
  • uneven scales development can occur 
  • tail may fold 

When water changes decrease:
  • fish activity is reduced and appetite decreased 
  • growth in length is suppressed 
  • head-growth develops 
  • scales are finely set 
  • due to less movement, tail will not fold 

This is also applies, when no green water method is used. Whether green water is used or not, balancing the time that ranchu spend in fresh and old water will affect the fish appearance. This alone, might be one of the most important conditions in raising traditional Japanese top view ranchu!

_________________________________________________________________________________

Links to published chapters:

● INTRODUCTION
● WATER
● NOTES ON GREEN WATER & WATER CHANGE
● WATER TEMPERATURE
● AERATION
● SUNLIGHT AND SHADE
● CONTAINERS FOR RAISING RANCHU
● FOOD
● FEEDING REGIMENT
● BREEDING & SPAWNING
● RAISING & GROOMING FRY
● GROOMING KUROKO AND TOSAI
● CULLING
● SELECTION METHODS
● CULLING ROUND - I
● CULLING ROUND - II
● CULLING ROUND - III
● CULLING ROUND - IV
● CULLING ROUND - V
● FORSEEING RANCHU CHANGES IN THE FUTURE

_________________________________________________________________________________


Sunday, August 27, 2017

A WAY TO RAISE RANCHU ● WATER


Tap Water

Tap or municipal water has pretty stable quality and good amount of oxygen. However, it needs to be treated for chlorine and/or chloramine. If left untreated, it is deadly for the fish. Please read here about the water conditioners. Depending on the region, tap water can be too soft and needs to be buffered and pH adjusted.


Well Water

In general, well water is not suitable for ranchu as it pumped out straight from the ground. It is often depleted of oxygen and can be too hard. A lab test can be performed to determine water composition. As a benefit, however, well water contains minerals and calcium that aids in skeletal development. It was observed that tail tension develops well in hard water, but it will slow down general growth of the fish, as compared with softer water. 

If using well water, for the best results, it can be mixed with tap water and aerated for at least overnight. In some set ups, water that is pumped out of the ground goes through the aerator tank. In this case it contains some oxygen and can be used for ranchu right away, considering that there are airstones in the ranchu pond. Read more here.


River or Lake Water

This water is not recommended for keeping ranchu. It may contain pathogens and parasites that can harm ranchu.


Green Algae Growth On The Surfaces Of The Pond

Green algae is a great food source for foraging ranchu. It is also where plankton lives. When green algae cover walls and bottom of the pond, they create a darker background to which fish reacts by developing a darker and richer color as a camouflage. It is believed that green algae growth is almost equally effective as use of green water. Benefits of green algae growth:

  • a place where plankton develops 
  • as a food rich in protein, vitamins and minerals 
  • pro-kinetic effect increases gastrointestinal activity 
  • positive for overall physical condition 
  • effecting fish color and its darkness 
  • promotes development of muscle tissue 


Cleaning the Pond


Algae growth on walls and bottom of the pond is beneficial to ranchu. Do not strip it all at once. Alternate cleaning of walls with cleaning of bottom to keep some of the algae growing at all times.

Clean the pond by brushing the walls and the bottom when algae growth gets too thick. Rinse the pond between cleanings. Read more here about the algae growth.


_________________________________________________________________________________

Links to published chapters:

● INTRODUCTION
● WATER
● NOTES ON GREEN WATER & WATER CHANGE
● WATER TEMPERATURE
● AERATION
● SUNLIGHT AND SHADE
● CONTAINERS FOR RAISING RANCHU
● FOOD
● FEEDING REGIMENT
● BREEDING & SPAWNING
● RAISING & GROOMING FRY
● GROOMING KUROKO AND TOSAI
● CULLING
● SELECTION METHODS
● CULLING ROUND - I
● CULLING ROUND - II
● CULLING ROUND - III
● CULLING ROUND - IV
● CULLING ROUND - V
● FORSEEING RANCHU CHANGES IN THE FUTURE

_________________________________________________________________________________


Saturday, November 26, 2016

WATER TEMPERATURE AND WATER CHANGE

Although, it is not cold in south-west Florida right now, the night temperatures are in the 60s F (15 C). During November, the water temperature in my ranchu pond fluctuated between 59-72 F (15-22 C). Pumped out of the ground well water is at 75-76 F (24 C) and comes much warmer than the water in the pond. The challenge becomes greater to perform water change, as the water in the pond is colder.

This temperature difference can have a negative effect on ranchu if exposed suddenly. Floating tubs with ranchu in the pond, brings the two temperatures closer together very quickly. As soon as the difference becomes less than 3 degrees F, the fish are good to go in the warmer water. Temperatures can be instantly checked with IR thermometer.


Friday, October 21, 2016

A TALE OF A TAIL

One of my female ranchu had recently damaged her tail. I have no idea how the side lobe of her tail got torn, and I have to admit it is quite upsetting to see a beautiful tail messed up.

Fortunately, goldfish have a great ability to regenerate damaged fins and tail quite fast, as well as their scales. While my ranchu "half tail" looked horrible, it is already healing, making a week old damage less noticeable each day. Although, it may not regenerate to its original beauty and the new tissue may not be as translucent, it will look normal and become functional again.


Healing tail side lobe of a nisai ranchu

The main key of the healing process is to have strong, well fed fish and VERY clean water. I don't use any medication or prophylactic treatment. Quality of the water is crucial and that is what I am focused on.

So, next time your goldfish turns up with damage fins or tail, give it a time and concentrate on maintaining exceptionally clean water. Your fish will be happy again in no time!


Thursday, September 8, 2016

A NEW CHAPTER BEGINS

It has been a long time since I've posted here. So, I thank you for your patience and understanding! I missed talking and sharing about my ranchu too.

But there were priorities. My new home required many hours of fixing and building and improving, before I could start thinking of my ranchu proper accommodations. It took a little over six months to finally come around to build a permanent display pond for my fish!

Here is what I have accomplished so far. After the screened aluminum cage with a solid roof was erected, and the deck with decorative walls were built, the final steps of ranchu display pond were as follows:

The deck was constructed with a step to accommodate the existing 8ft x 2ft x 1ft (2.4m x 61cm x 30cm) fiberglass pond. Deck step allowed me to have the pond recessed for a more pleasant display.   


Now, the drain. Previously, I have used a pump to move the water in and out of the pond. This time, I wanted to install a drain and let gravity do the job. My objectives were to have the drain that could be SECURELY plugged and to use the simplest plumbing possible. After much deliberation, I ended up with purchasing five components: 
  • heavy duty garden hose 
  • nozzle
  • ¾ garden hose to ¾ NPT brass coupler
  • bulkhead fitting 
  • rubber plug


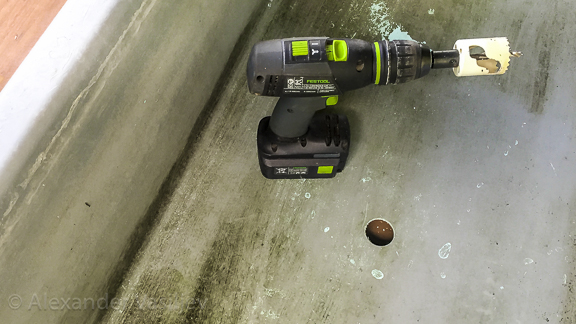
After the hole in the fiberglass pond was drilled, I fitted it with the bulkhead assembled with a brass coupler.


The garden hose was attached to the coupler underneath the pond and threaded through the hole left in the screened cage concrete header. 


Finally, the moment I had been waiting for - to fill the pond with water and let the ranchu into their new home!


Here are a few comments and technical details. Due to under one inch (2.5 cm) garden hose diameter and less than two feet high gradient between the bottom of the pond and the draining ground, the time to empty the pond with its over 115 gal (435 l) of water is lengthy, about 45 to 50 min. But not a big trade off considering that the drain assembly is super simple, super reliable and very easy to fix. For my display pond I perform 100% water change every two weeks, as I still use bio filtration and a UV lamp. 

On the other hand, to fill back the pond is a breeze. The water comes from the well and as soon as the pond is full the ranchu are in. No additional chemicals are used and the temperature of freshly pumped water is within 1-2 degrees of the water temperature in the tub. In addition, my well water is first pumped in to an aerator and gets infused with some oxygen, further I turn up the air pump during the filling. So far, I haven't noticed any visual distress when the ranchu enter fresh water. The deck and the pond are under the solid roof that deflects heat and protects from direct rain, and since the screened cage is opened on all three sides, there is a plenty of breeze to cool the summer heat. Water temperature stays below 83F (28C) even when the air temperature soars well above 90F (32C).  

I have more improvements on the way and of course I have to start and finish the fishery, BY FEBRUARY! It is going to be a separate structure with a series of ponds and a culling station. But for now, I can take a short brake and enjoy my ranchu peacefully swimming in their new home! The new chapter has began!


Monday, January 12, 2015

WATER CONDITIONING

If municipal water is used in ranchu keeping, water conditioning is very important. When water has to be replaced all at once and be instantly ready for ranchu, water conditioner is required to neutralize deadly chlorine. Besides chlorine some municipalities use chloramine, which is also harmful to the fish. Of all aquarium water conditioners available, I have selected and used those with broad neutralizing spectrum. Of these, I prefer ULTIMATE distributed by Hikari Sales USA, Inc. and PRIME manufactured by Seachem. Both will remove chlorine, chloramine and ammonia; detoxify nitrite and heavy metals; replace fish's slime coat. In addition PRIME will remove nitrate.


PRIME by Seachem
ULTIMATE by Hikari Sales USA, Inc.
 

Although both work well and I highly recommend them, my choice is PRIME due to its economic usage. A 16.9 FL OZ (500 ML) bottle of PRIME will treat about 5000 US GAL (18927 L) of water. Whereas, 16 FL OZ (473 ML) bottle of ULTIMATE will treat 960 US GAL (3634 L). Although the initial price of PRIME could be higher, the cost per water treatment is a bargain.

Quick tip - to easy dose water conditioner I use syringe with 10 ml capacity.


Saturday, December 20, 2014

WINTER WATER CHANGES

Winter time! Elsewhere it might mean cold and snow, but here in Washington, DC it is still mild, camellias are in bloom. Outside temperatures have been fluctuating between 30s, high 40s and low 50s (0-10 C). With the water temperature in my pond at 62-63 F (16.5-17 C), I feed Azayaka pellets once a day, the rest of the time the ranchu graze on algae and rest. Although, the water temperature isn't as low to allow hibernation, my ranchu have noticeably slowed their activities. In a week, I am going to start again feeding them frozen bloodworms, supplementing with a smaller amount of Azayaka pellets until warmer time. Hopefully by then the spawning will begin, which is usually spring in my case.

With less feedings the water change regiment is adjusted. In the winer, I perform 100% water change only every second week, instead of every week like I do the rest of the year. The bio filter is working well and the UV sterilizer is always on, maintain a good water quality. In addition, I remove poop from the bottom of the pond each morning. Clay is added once a week. 

For those of us whose ranchu aren't covered in snow and hibernating, it is a good time to enjoy them more and contemplate their beauty. Now is a less laborious time, but also the time to make sure that everything is in check, as the spawing season is just around the corner. 

Saturday, November 8, 2014

I DISCOVERED A CLAY

Reading through Goldfish Keepers Forum, I stumbled upon David Lains' post, where he referred to an article "Using Clay to Protect Catfish" published in Aquaculture North America. Being quite fascinated with this information, I searched the internet for more, and quickly became convinced of clay's undeniable benefits. Previously, I didn't know that clay had been in use for koi keeping for a very long time and is a standard practice for many koi breeders.

Of course not every clay is made equal. Out of several main clay groups, smectite group is of interest to us. It includes montmorillonite clay, also known as bentonite clay. Essentially, montmorillonite and bentonite clays are the same, with the first named in 1847 after a small town Montmorillon in western France, and the second after Benton Shale in Wyoming, USA in 1898. As montmorillonite clay was described and named first, it claims to be the valid name. This clay besides Montmorillon and Wyoming is mined in many other parts of the world and, depending on the deposit and location, have various mineral compositions. For the fish pond, however, only calcium montmorillonite clay is used.


Erosion formation in the soft bentonite clay, Cathedral Gorge State Park. Nevada, USA (open source image)

What are the benefits of using it in our fish tanks and ponds? The first main benefit of this clay is in its high mineral content that provides well over 50 macro, micro and trace elements "remineralizing" the aquatic system. All living organisms, including goldfish, require a constant supply of these elements for various biological processes to function normally. It also improves fish digestion. Second, is its detoxifying effect. The clay's particles are so small that the action of water molecules is enough to keep them in suspension or colloidal state. The surface area of particles in one gram of clay can reach almost 10,764 sq.ft (1000 sq.m). Negatively charged clay particles have the ability to "trap" or flocculate heavy metals, pesticides, free radicals and even virus cells, etc., making them easily removable with mechanical filters and water changes. Third, it accelerates bio filter work by positively affecting nitrifying bacteria, at the same time, based on the article mentioned above, it can protect the fish from certain pathogenic bacteria causing skin and gill tissue damage.

Properties of clay go well beyond described above. In fact, "montmorillonite is also known to cause micelles (lipid spheres) to assemble together into vesicles. These are structures that resemble cell membranes on many cells. It can also help nucleotides to assemble into RNA, which will end up inside the vesicles. It has been demonstrated that this could have generated highly complex RNA polymers that could reproduce the RNA trapped within the vesicles. This process may have led to the origin of life on Earth" (courtesy of Wikipedia). Interestingly, according to Old Testament, the first man was made of clay (earth, dust).

Now back to goldfish. There are several brands of calcium montmorillonite clay on the market for use in ponds - Ultimate Koi Clay (USA), Microbe-Lift CMC (USA), Terra Pond (USA), Thrive (USA), Kusuri Klay (UK) and Refresh (Japan) among a few others. Also, there is a human grade, edible calcium montmorillonite clay that is suitable for using in the fish tank, one of the known brands is Terramin. And yes, this clay is edible and is consumed as a food supplement by various animals, wild and domestic, including humans.


calcium montmorillonite clay

I started using calcium montmorillonite clay in my ranchu pond a month ago. Although, there are no obvious effects on my ranchu that I notice at the moment, I know that I am supplying important minerals and trace elements back into the system. In my case, municipal water is used, which based on published analysis contains only some of the necessary minerals. This, however, would'nt compare with the rich mineral content of calcium montmorillonite clay. Besides, the minerals must be in constant supply, as they are being used up by the living organisms.


I use half a teaspoon for my 100 gal pond once a week, by first "dissolving" clay in a bottle of pond water and then pouring it back into the pond. The water gets cloudy only for a few hours before it clears up, depending on the amount added. As I mentioned earlier, mineral composition of this clay greatly depends on the source. This is also true for pH and hardness that the clay will add to the pond water. Based on the tests provided in "Consumer Report: Koi Clay Mysteries Revealed" (see below) the pH of different clays ranges mostly from 7.65 to 8.7 and hardness from 31 to 74 ppm. In my case, added clay did not change the pH and it remained at 8.2. It is important, as in everything, not to overuse the clay and follow the recommended instructions. I would also recommend testing the water regularly, until it is clear how the clay effects the water environment. And as always, regular water changes are mandatory.

FURTHER READING: Consumer Report: Koi Clay Mysteries Revealed by Michael D.Cox, Koi Clay Article by Wayne Smith, Montmorillonite by Chris Neaves, Understanding Clay by Manky Sanke


Friday, July 25, 2014

DISTRACTED, YOU MUST NOT BE

Over a couple of days I have noticed unusual behavior in one of my young tosai. The fish was not swimming much, taking longer rests on the bottom of the pond. I observe it for a few days, but could't find an answer, when I finally realized that it had something to do with water pH.

After checking pH, I was astounded to find that it had dropped to 6.6 - 6.8 from its usual 8.0 - 8.3. This is what I was so afraid of for some time, reading the stories how everyone will go through one of these pH drops and loose all the fish.

It has been a lot of work since the April spawn, as I have being occupied with rasing the young. I lowered my guards and wasn't taking pH readings often enough, thinking that the water quality was always good, since I use bio filter and perform weekly 90% water changes.

With the addition of the spawn, the bio-load had increased and I neglected cleaning the filter from all the gunk for too long. As a result, I had my first bio-filter "malfunction" followed by a pH drop.

I spent today cleaning the filter and doing 100% water change. After the cleanup the pH went up to 7.7 - 7.8. I will be checking it regular and hope it will stabilize fast. The buffering capacity of my municipal water is good.

The lesson is learned - don't get distracted!


WATERCRESS? WHY NOT?!

Continuing my ongoing trial and error experience with the pond, I thought, why not watercress? I am still looking for more ways to lower nitrates, besides 100% water changes.

Right now, the pandanus plants (Pandanus amarillifolius) that I have been growing in the ranchu pond are flourishing. I bought two kinds -  tissue cultured small plants eight months ago (see my post "Pandanus Plant") and an adult pandanus 1.5 foot (45 cm) tall, that I divided on three pieces. New roots are developing well and judging by the new growth and color, the plants are getting enough nutrients.


Pandanus plants growing in my ranchu pond

The water is drained to show pandanus root system


To extend my nitrate "elimination", I am now trying out watercress (Nasturtium officinale). This plant is aquatic or semi-aquatic, naturally found in and around freshwater streams. I thought that watercress would be a perfect candidate to grow in my ranchu pond. Being a popular leaf vegetable in my kitchen, I am also looking forward to consuming it.

I started off by germinating watercress seeds in finally cut paper towel. Keeping the substrate very wet was the key. Why cut paper towels? I try to avoid introducing pathogens and any other unwanted elements into my ranchu pond. Any plant's root system that had been grown previously in the soil, I sterilize with bleach. Cut paper towels offer a clean substrate.


After the seedlings developed 2-4 true leaves and a root system, they had been transplanted on pieces of Matala filter media, which I have been using in my bio filter. Matala mats seem to be a perfect medium for using in my improvised hydroponic culture. I hooked strips of Matala to the edge of the pond with hooks made of galvanized wire, so the strips are halfway in the water, allowing only the root system to be submerged. 


Fifteen days later, my watercress plants are growing well. With little time, their root system will come through the Matala mats using up the nitrates and growing succulent leaves for my kitchen.