HIGH RANCHU MON

HIGH RANCHU MON
Art by Alexander Vasiljev, Copyright © 2020

HIGH RANCHU STORE - AZAYAKA RANCHU FOOD

Monday, October 31, 2016

TRANQUIL SOUND OF WATER

I have two old bamboo clumps on the property, each with 50-60 ft (15-18 m) tall stalks. An endless bamboo supply for all the things I would like to make. One of them - kakei or bamboo spout. A great feature that I recently added to my ranchu pond.

A small pump supplies water to the kakei. Not just visual, it makes a beautiful sound and in addition, aids in water circulation. It makes the ranchu pond complete.

Amidst the daily chores, I need to find more time to succumb to the tranquility of the setting and contemplate the motion of ranchu!


Friday, October 21, 2016

A TALE OF A TAIL

One of my female ranchu had recently damaged her tail. I have no idea how the side lobe of her tail got torn, and I have to admit it is quite upsetting to see a beautiful tail messed up.

Fortunately, goldfish have a great ability to regenerate damaged fins and tail quite fast, as well as their scales. While my ranchu "half tail" looked horrible, it is already healing, making a week old damage less noticeable each day. Although, it may not regenerate to its original beauty and the new tissue may not be as translucent, it will look normal and become functional again.


Healing tail side lobe of a nisai ranchu

The main key of the healing process is to have strong, well fed fish and VERY clean water. I don't use any medication or prophylactic treatment. Quality of the water is crucial and that is what I am focused on.

So, next time your goldfish turns up with damage fins or tail, give it a time and concentrate on maintaining exceptionally clean water. Your fish will be happy again in no time!


Monday, September 19, 2016

AZAYAKA PELLETS HAVE BEEN DELIVERED

I just received a familiar package marked "Japan Post" that I have gotten many times. Somehow, it is still as exciting as it was my first time to open it. And here I am sharing the excitement.

I decided to switch to Azayaka brand pellets a year ago and have observed nothing but improvements in my fish: no bloating, no manifestation of swim bladder disease, less poop, cleaner water, stronger color.

This package is for my adult fish and a couple of bags of color enchanting pellets to keep the ranchu more beautiful!


Green bag is Azayaka Basic, pellet size SS (2-3mm) and Purple bags of Azayaka Color Enhancing Astaxanthin, pellet size small grain (1.8-2.8mm)


Thursday, September 8, 2016

A NEW CHAPTER BEGINS

It has been a long time since I've posted here. So, I thank you for your patience and understanding! I missed talking and sharing about my ranchu too.

But there were priorities. My new home required many hours of fixing and building and improving, before I could start thinking of my ranchu proper accommodations. It took a little over six months to finally come around to build a permanent display pond for my fish!

Here is what I have accomplished so far. After the screened aluminum cage with a solid roof was erected, and the deck with decorative walls were built, the final steps of ranchu display pond were as follows:

The deck was constructed with a step to accommodate the existing 8ft x 2ft x 1ft (2.4m x 61cm x 30cm) fiberglass pond. Deck step allowed me to have the pond recessed for a more pleasant display.   


Now, the drain. Previously, I have used a pump to move the water in and out of the pond. This time, I wanted to install a drain and let gravity do the job. My objectives were to have the drain that could be SECURELY plugged and to use the simplest plumbing possible. After much deliberation, I ended up with purchasing five components: 
  • heavy duty garden hose 
  • nozzle
  • ¾ garden hose to ¾ NPT brass coupler
  • bulkhead fitting 
  • rubber plug


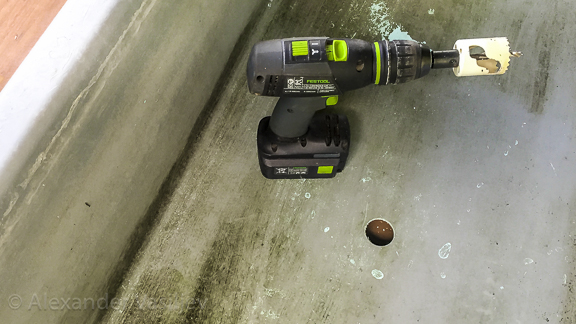
After the hole in the fiberglass pond was drilled, I fitted it with the bulkhead assembled with a brass coupler.


The garden hose was attached to the coupler underneath the pond and threaded through the hole left in the screened cage concrete header. 


Finally, the moment I had been waiting for - to fill the pond with water and let the ranchu into their new home!


Here are a few comments and technical details. Due to under one inch (2.5 cm) garden hose diameter and less than two feet high gradient between the bottom of the pond and the draining ground, the time to empty the pond with its over 115 gal (435 l) of water is lengthy, about 45 to 50 min. But not a big trade off considering that the drain assembly is super simple, super reliable and very easy to fix. For my display pond I perform 100% water change every two weeks, as I still use bio filtration and a UV lamp. 

On the other hand, to fill back the pond is a breeze. The water comes from the well and as soon as the pond is full the ranchu are in. No additional chemicals are used and the temperature of freshly pumped water is within 1-2 degrees of the water temperature in the tub. In addition, my well water is first pumped in to an aerator and gets infused with some oxygen, further I turn up the air pump during the filling. So far, I haven't noticed any visual distress when the ranchu enter fresh water. The deck and the pond are under the solid roof that deflects heat and protects from direct rain, and since the screened cage is opened on all three sides, there is a plenty of breeze to cool the summer heat. Water temperature stays below 83F (28C) even when the air temperature soars well above 90F (32C).  

I have more improvements on the way and of course I have to start and finish the fishery, BY FEBRUARY! It is going to be a separate structure with a series of ponds and a culling station. But for now, I can take a short brake and enjoy my ranchu peacefully swimming in their new home! The new chapter has began!


Sunday, March 6, 2016

HIGH RANCHU RELOCATION REPORT


At the end of February, the "Big Move" was approaching fast. To prepare my ranchu for a two day journey, I purchased two plastic storage containers with snap on lids. After drilling several venting holes through the lids, I filled each with about 15 gal (57 L) of water, added Prime de-chlorinator and aeration, and transferred the ranchu into them. We where planning to drive late afternoon on Friday, so I had my fish in containers by Thursday morning. No food was given, to purge the fish from excrements. This helps to keep the water clean and with less ammonia build up. Since goldfish will eat back their excrements (read my earlier post "Poopie Monster") I periodically syphoned any derbies.

After the U-Haul truck was loaded and ready to depart, I combined my eight ranchu into one of the two plastic containers and filled it less than 3/4 of its high with fresh dechlorinated water. Container with fish was placed into another container for strength. Lid on. I had it set up on the middle seat of the driver's cabin.

You really become a good driver, when traveling with fish. Quickly you learn to brake and accelerate smoothly. Still, have a couple of towels on hand if the lid isn't airtight.

We did stopped midway for the night and I brought my ranchu inside the motel room and set it with a couple of airstones for the night. Still no food was given! Saturday early morning we were on the road, arriving to our new home in the evening. I had my friend fill a couple of children's pools with the well water from the property and let it sit for a day.

About the well water that I am going to be using. Some of the parameters are

pH - 7.5-7.8
Hardiness - 55 grains per gallon
TD Solids - 985-1000
Iron - 0.5 per million

A month prior to bringing my ranchu to Florida, I made an experiment to hard test my well water. I bought several goldfish from a local Petsmart and kept them for a two weeks in the well water. The fish were doing great! As I was feeling guilty for using these fishes as an experiment, I fed them well and they grew noticeably.

So, here I was, on Saturday night letting my precious ranchu in the water where they will be living and breeding. I set up their original 8 x 2 ft (2.4 x 0.6 m) fiberglass pond and it has been a week since they are in the well water. The ranchu are doing great! As the day temperatures in Florida are warmer than they were in my Washington DC apartment, ranchu's appetite has doubled.

With all this, I have to get used to one thing - NO WATER CONDITIONERS!!! I no longer have to use any de-chlorinators. The well water gets aerated as soon as it is pumped out and can be used straight as is.

First big step is taken, lot's more work ahead.


Storage containers for transporting my ranchu.
Venting holes on the lid.

High Ranchu purging before the trip.

Necessary equipment while traveling: dozing syringe, water conditioner, digital infrared thermometer, air pump, airstone (not shown).

Storage container with ranchu in U-Haul cabin.

Finally, High Ranchu arrived. Temporary home, before their pond is set up.